If you’re looking to give your kitchen a fresh and modern look, repainting your cabinets can be one of the most effective ways to do it. With a little bit of time, effort, and the right techniques, you can achieve a beautiful finish that can elevate your kitchen’s overall aesthetic. This guide will walk you through the entire process of repainting kitchen cabinets while ensuring you avoid common pitfalls.
Why Repaint Kitchen Cabinets?
Cost-Effective Upgrade
Repainting is significantly more affordable than replacing cabinets, allowing you to refresh your kitchen without breaking the bank. Depending on the size of your kitchen and the materials you choose, repainting can save you thousands compared to a complete remodel.
Endless Color Options
Whether you want a vibrant pop of color or a soft, neutral tone, repainting offers the flexibility to achieve any look you desire. You can create a cohesive aesthetic by choosing colors that complement your existing decor or try something bold for a contemporary twist. The right color can also make your kitchen feel larger and more inviting.
Increase Home Value
A beautifully painted kitchen can make your home more appealing to potential buyers, boosting your property’s market value. According to real estate experts, kitchens are one of the most significant selling points for homes, and an updated look can yield a high return on investment.
Essential Tools and Materials for Repainting Cabinets
Before you begin your project, gather all the necessary tools and materials to ensure a smooth process. Here’s what you’ll need:
- Paint: Opt for a high-quality product designed specifically for cabinetry. This will ensure durability and a smooth finish.
- Primer (stain-blocking): A good primer is crucial for preventing stains and ensuring better adhesion of the paint.
- Paintbrushes and rollers: Use a combination of brushes for detail work and flock rollers for larger flat surfaces to minimize brush strokes
- Sandpaper: Sanding is essential for preparing the surfaces, so make sure you have both coarse and fine sandpaper.
- Clean rags: Use these for cleaning surfaces and wiping away dust.
- Drop cloths: Protect your floors and countertops from paint splatters and spills.
- Screwdriver for removing hardware: This will make it easier to access all surfaces.
Step-by-Step Guide to Repainting Cabinets in Your Kitchen
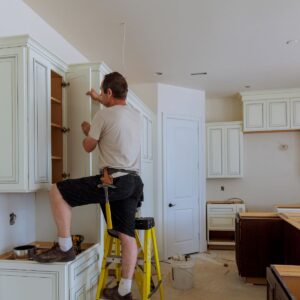
Step 1: Preparation is Key
Start by removing all cabinet doors, drawers, and hardware. Label each door and its corresponding hardware for easy reinstallation later. This will make the repainting process much easier and allow you to clean every surface thoroughly.
Step 2: Clean the Surfaces
Use a mixture of warm water and mild detergent to clean the cabinet surfaces thoroughly, removing any grease or grime. This step is crucial; any leftover dirt or grease can interfere with the paint’s adhesion, leading to peeling or chipping down the line.
Step 3: Sanding for Smoothness
Sand the surfaces with 120-grit sandpaper to remove the old finish and provide a good surface for the new paint. This helps the primer and paint adhere better. Finish with 220-grit sandpaper for a smooth touch, ensuring there are no rough spots that could affect the finish.
Step 4: Apply Primer
Using a stain-blocking primer, apply an even coat to all surfaces. Priming is crucial for achieving a smooth, durable finish. Ensure the primer dries completely before moving to the next step. This can take a few hours, depending on the humidity and temperature in your workspace.
Step 5: Paint Application
Once the primer is dry, apply your chosen paint. Use a high-quality brush for edges and detailed areas, and a roller for larger flat surfaces. Apply the paint in thin, even coats, allowing each coat to dry before applying the next. You may need two to three coats for complete coverage, especially if you are painting over a darker color.
Step 6: Finish with a Topcoat
After the paint dries, apply a clear protective topcoat to enhance durability, especially in high-traffic areas. This will help protect the paint from scratches and stains, ensuring your cabinets look great for years to come.
Tips for a Professional-Looking Finish
- Use quality brushes and rollers: This minimizes brush marks and helps achieve an even coat. Investing in good tools pays off in the quality of your finish.
- Lightly sand between coats: This is crucial for the best adhesion and a smooth finish. It may seem tedious, but it’s a game-changer for the overall look of your cabinets.
- Work in a well-ventilated area: Proper airflow helps paint dry more evenly and reduces the buildup of fumes, making the experience safer and more pleasant.
Common Mistakes to Avoid When Repainting Cabinets
- Skipping the Primer: Neglecting this step can result in peeling and poor adhesion, leading to frustration in the long run.
- Using Low-Quality Paint: While it might be tempting to save money, investing in quality paint is essential for durability and a long-lasting finish.
- Rushing the Process: Take your time to ensure each coat dries fully before moving on to the next step. Patience will pay off with a flawless finish.
Additional Considerations
Color Trends and Inspiration
As you consider your color choices, it’s worth exploring current trends. Shades like soft blues, deep greens, and classic whites are very popular. You might also consider using two contrasting colors—one for the cabinets and another for the island—to create a dynamic look.
Eco-Friendly Options
If you’re concerned about the environmental impact of your renovations, look for eco-friendly paints that have low volatile organic compounds (VOCs). These paints are better for indoor air quality and are just as durable as traditional paints.
DIY or Hire a Professional?
Deciding whether to tackle this project yourself or hire a professional depends on your comfort level and skill set. While DIY can save you money, professional painters have the experience and tools that can ensure a top-notch finish.
FAQs About Repainting Kitchen Cabinets
Q1: Can I use regular wall paint for cabinets?
No, it’s best to use paint specifically designed for cabinets for durability and a smooth finish. Regular wall paint may not adhere well to the cabinet surface and could lead to peeling.
Q2: How long will the paint last?
With proper prep and application, cabinet paint can last 5-10 years before needing a touch-up. Regular maintenance, like cleaning and occasional re-sealing, can extend its life.
Q3: Do I need to remove the cabinet doors for painting?
While not mandatory, removing the doors allows for a more even finish and easier application. It also helps you reach all nooks and crannies that might be missed if you paint them while attached.
Q4: Can I repaint laminate cabinets?
Yes, but make sure to use a bonding primer designed for laminate surfaces. This ensures the paint adheres well and provides a durable finish.
Q5: What type of paint finish is best for kitchen cabinets?
A semi-gloss or satin finish is often recommended for easy cleaning and durability. These finishes resist moisture and stains, making them ideal for kitchen environments.
Conclusion – Transform Your Kitchen with a Fresh Coat of Paint
Repainting kitchen cabinets is an effective way to rejuvenate your kitchen space without the hefty price tag of a full remodel. By following the steps outlined in this guide, you can achieve a professional finish that enhances your kitchen’s overall look and feel.
Don’t hesitate to embrace creativity and experiment with colors. A well-executed paint job can breathe new life into your cabinets, making your kitchen a more inviting and stylish space. With the right techniques and a bit of patience, your kitchen cabinets can shine like new, making you proud of your DIY skills.